Why React Exists: From Philosophy to the Virtual DOM
If you have been writing JavaScript for a while, you have probably built web pages by selecting elements with document.getElementById and changing their content directly. That approach works for small projects. But once your application grows, keeping track of what changed, when it changed, and which parts of the page need updating becomes exhausting. You end up with scattered event handlers, hidden state buried in DOM nodes, and bugs that appear only when you click things in a specific order.
React was created to solve this mess. But before we talk about how React works, we need to understand why it works the way it does. The Virtual DOM is not a random optimization. It is the practical answer to a philosophical question: what if building user interfaces could be simpler?
The Philosophy: UI as a Function of State
In traditional JavaScript development, you write code that tells the browser exactly what to do. You query an element, modify it, attach an event listener, and update another element in response. This is called imperative programming. You describe how to achieve a result, step by step.
React flips this around with a concept from functional programming:
UI = f(state)
Your user interface should be a pure function of your application state. Give React the same state, and it should produce the same UI. No hidden mutations. No manual DOM manipulation. Just: here is my data, here is what the page should look like.
This sounds abstract, so let us look at what it means in practice.
A Quick Word on State and Props
Before we go further, two terms will come up constantly in React. You need to know what they mean.
State is data that belongs to a component and can change over time. Think of it as the component's memory. When state changes, React re-renders the component to reflect the new data. In modern React, you create state using the useState hook.
Props (short for "properties") are data passed from a parent component to a child component. They are read-only. A child component cannot modify its own props. They are how components communicate with each other.
Here is a simple example that uses both:
import { useState } from 'react';

function Counter() {
  // 'count' is state. It starts at 0.
  // 'setCount' is the function that updates it.
  const [count, setCount] = useState(0);

  return (
    <div>
      <p>You clicked {count} times</p>
      <button onClick={() => setCount(count + 1)}>
        Click me
      </button>
    </div>
  );
}
In this component, count is state. It changes when you click the button. React sees that change and updates the UI automatically. You never touch the DOM directly.
Now here is a component that receives props:
function Greeting({ name, role }) {
  // 'name' and 'role' are props passed from a parent
  return (
    <div>
      <h1>Hello, {name}</h1>
      <span className="badge">{role}</span>
    </div>
  );
}

// Used like this in a parent component:
// <Greeting name="Sarah" role="admin" />
name and role are props. They come from outside. The Greeting component reads them and renders accordingly. It cannot change them. If the parent passes different values, React re-renders Greeting with the new props.
With that foundation, let us return to the philosophy.
Why Imperative Programming Breaks Down
Here is a typical imperative approach to building a todo list:
const input = document.getElementById('todo-input');
const button = document.getElementById('add-btn');
const list = document.getElementById('todo-list');
const countDisplay = document.getElementById('count');

let todos = [];

button.addEventListener('click', () => {
  const text = input.value.trim();
  if (!text) return;

  todos.push({ id: Date.now(), text, done: false });

  const li = document.createElement('li');
  li.textContent = text;
  li.dataset.id = todos[todos.length - 1].id;

  const checkbox = document.createElement('input');
  checkbox.type = 'checkbox';
  checkbox.addEventListener('change', (e) => {
    const id = parseInt(e.target.parentElement.dataset.id);
    const todo = todos.find(t => t.id === id);
    todo.done = e.target.checked;
    updateCount();
  });

  li.prepend(checkbox);
  list.appendChild(li);

  input.value = '';
  updateCount();
});

function updateCount() {
  const remaining = todos.filter(t => !t.done).length;
  countDisplay.textContent = `${remaining} items left`;
}
This code works. But notice what is happening. Your application state (the todos array) lives in a variable. Your UI state lives in the DOM. The two are kept in sync manually. If you need to add a "clear completed" button, you must write code that updates both the todos array and the DOM. If you forget one, you have a bug.
The DOM becomes your source of truth, and that is a terrible source of truth. DOM nodes contain presentation logic, event listeners, inline styles, and data attributes all mixed together. You cannot look at this code and know what the page looks like at any moment. You have to mentally simulate the runtime state.
React's philosophy says: separate the what from the how. Describe what the UI should look like based on data. Let React handle how to update the browser.
The Problem React Solves: The DOM Is Expensive
To understand why React needs the Virtual DOM, you need to understand what makes the Real DOM slow and computational expensive.
The browser's DOM is the structured representation of your HTML. When JavaScript modifies it, even something as simple as changing text:
document.getElementById('counter').textContent = 'Count: 5';
The browser performs a sequence of operations:
Recalculate styles: Does this change affect CSS rules? Does the element's computed style change?
Layout: Did the element's size or position change? Do parent or sibling elements need to shift?
Paint: Which pixels changed? The browser repaints affected regions.
Composite: Layer multiple painted elements together for the final image.
These steps are collectively called the render pipeline. They are fast for a single change, but they compound. Modify ten nodes in a loop, and the browser may run layout ten times. Some properties force synchronous layout recalculation, blocking the main thread. The UI freezes.
In the imperative world, developers manually optimized this. They batched DOM reads and writes, used DocumentFragment, avoided layout-triggering properties. It worked, but it was tedious and required deep browser knowledge. The optimizations leaked into application logic.
React says: you should not have to think about this. But to make that possible, React needs a layer between your declarative components and the browser's imperative DOM.
What Is the Virtual DOM?
The Virtual DOM is a plain JavaScript object tree that mirrors the structure of the Real DOM. It is not a browser API. It does not paint pixels. It lives entirely in memory.
Here is a React component:
function Welcome({ name }) {
  return (
    <div className="welcome-card">
      <h1>Hello, {name}</h1>
      <p>Welcome to the application.</p>
    </div>
  );
}
React converts this JSX into a Virtual DOM tree that looks conceptually like this:
{
  type: 'div',
  props: {
    className: 'welcome-card',
    children: [
      {
        type: 'h1',
        props: { children: 'Hello, Sarah' }
      },
      {
        type: 'p',
        props: { children: 'Welcome to the application.' }
      }
    ]
  }
}
A Real DOM node is a complex browser object with dozens of properties and methods. A Virtual DOM node is just an object with type, props, and children. Creating it is cheap. Modifying it is cheap. Throwing it away and creating a new one is cheap.
| Real DOM | Virtual DOM |
|---|---|
| Complex browser-native object | Plain JavaScript object |
| Expensive to create and modify | Cheap to create and discard |
| Directly triggers browser rendering | Lives in memory, zero visual impact |
| Contains methods, event listeners, styles | Contains only rendering information |
The Virtual DOM lets React embrace its declarative philosophy without being constrained by browser performance. You write components that describe the UI. React builds a lightweight representation. Then it figures out the minimal changes needed to sync with the Real DOM.
The Complete React Update Lifecycle
Now let us walk through exactly what happens when your React application runs. This is where theory meets practice.
Phase 1: Initial Render
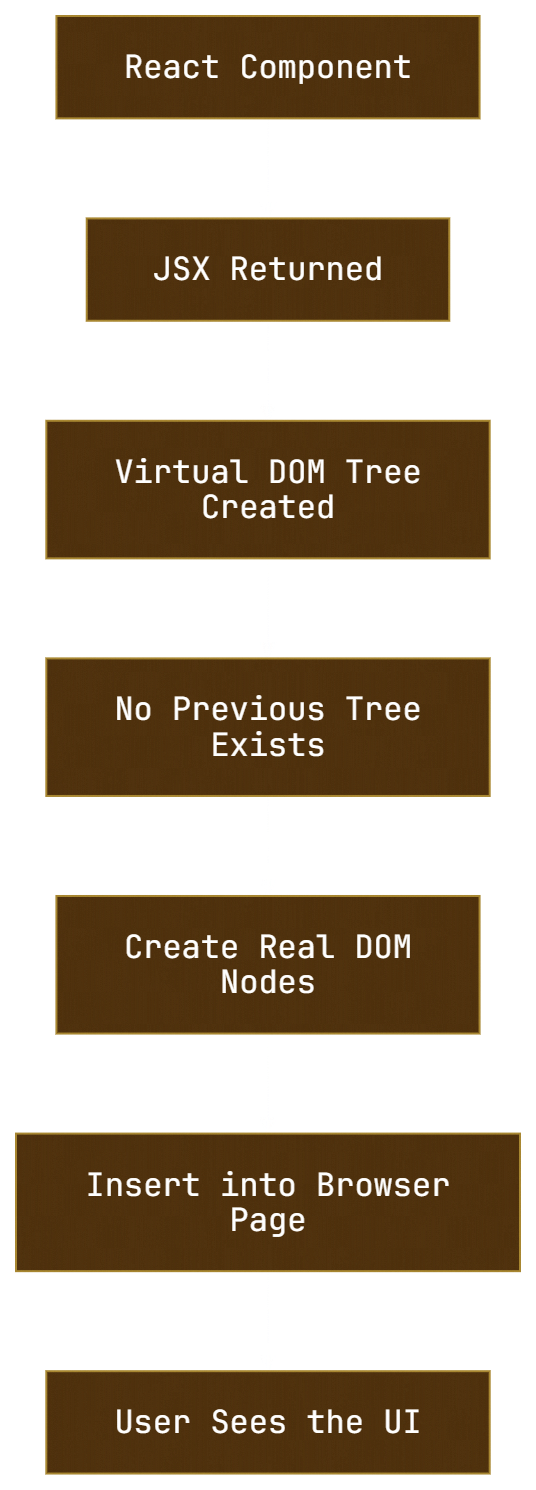
When your app first loads, the browser page is empty. React has no previous UI to update.
function App() {
  const [user, setUser] = useState({ name: 'Alex', role: 'admin' });

  return (
    <div className="dashboard">
      <header>
        <h1>Dashboard</h1>
        <span className="role-badge">{user.role}</span>
      </header>
      <main>
        <p>Welcome back, {user.name}</p>
      </main>
    </div>
  );
}
React executes your component function. It takes the returned JSX and constructs the first Virtual DOM tree. Since there is no previous tree, React skips diffing entirely. It translates the entire Virtual DOM tree into Real DOM nodes and inserts them into the page.
Phase 2: State or Props Change
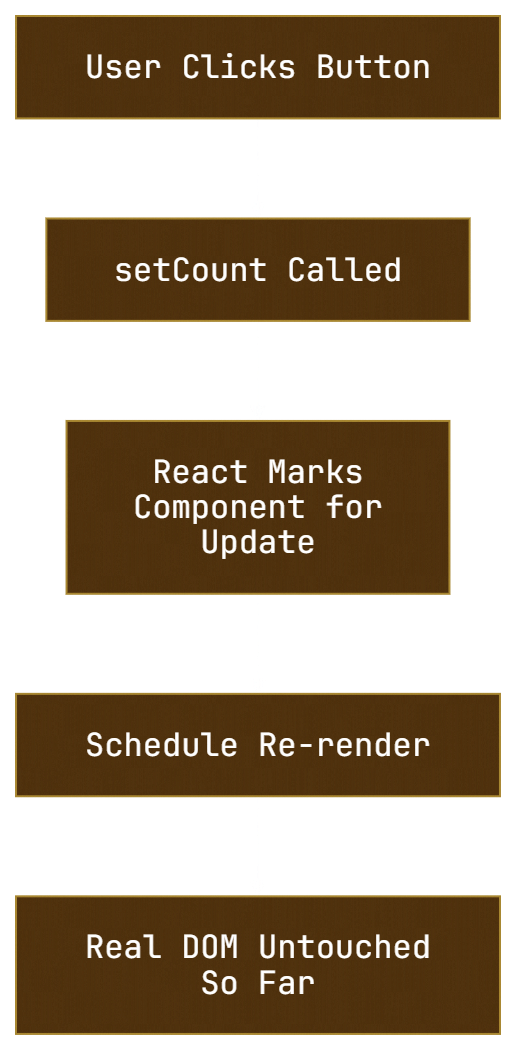
Now the user clicks a button, a timer fires, or data arrives from an API. Your component's state changes. Remember, state is the component's own data that can change over time.
function Counter() {
  const [count, setCount] = useState(0);

  return (
    <div>
      <p>Count: {count}</p>
      <button onClick={() => setCount(count + 1)}>
        Increment
      </button>
    </div>
  );
}
When setCount(1) is called, React marks this component as needing an update. It schedules a re-render. Importantly, React does not touch the Real DOM yet. It has not even figured out what changed.
Phase 3: A New Virtual DOM Tree Is Created
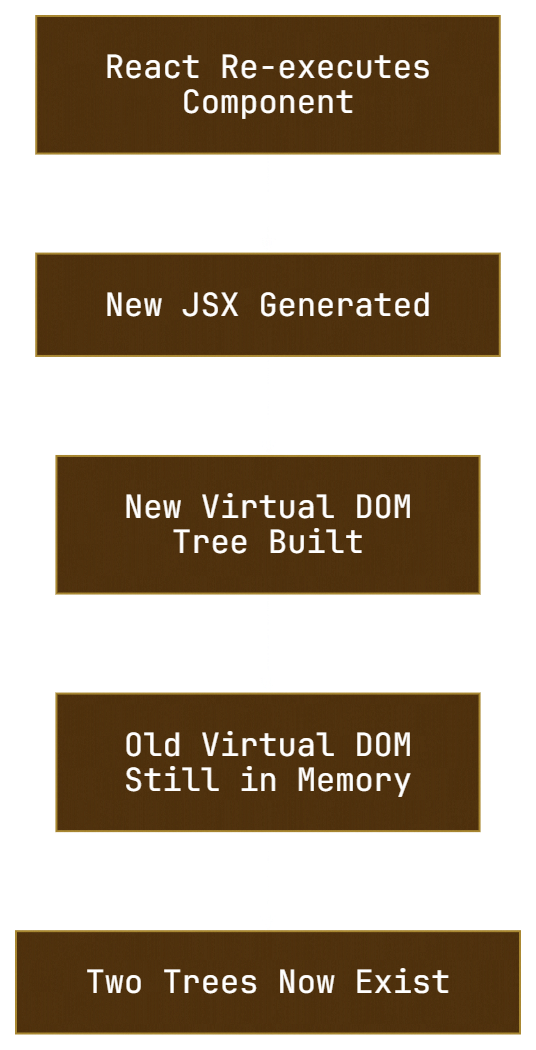
React calls your Counter component again with the new state. It gets fresh JSX:
<div>
  <p>Count: 1</p>
  <button onClick={() => setCount(count + 1)}>
    Increment
  </button>
</div>
React builds a brand new Virtual DOM tree from this JSX. It does not reuse or mutate the old Virtual DOM tree. This new tree represents what the UI should look like now.
Creating a new tree is cheap because it is just JavaScript objects. React can afford to do this on every update.
Phase 4: Diffing (Reconciliation)
Now React has two trees in memory:
Tree A: The old Virtual DOM (from the previous render)
Tree B: The new Virtual DOM (from the current render)
React runs a diffing algorithm to compare these two trees. This process is called reconciliation. Its goal is simple: find the minimum number of changes needed to transform Tree A into Tree B.
React makes two key assumptions to keep this fast:
Different element types produce different trees. If a
divbecomes aspan, React destroys the old subtree and builds a new one. It does not bother comparing children.Keys hint at which elements are stable. If you render a list and give each item a stable
key, React knows which items moved, were added, or were removed. Without keys, it guesses based on position, which often leads to unnecessary re-renders.
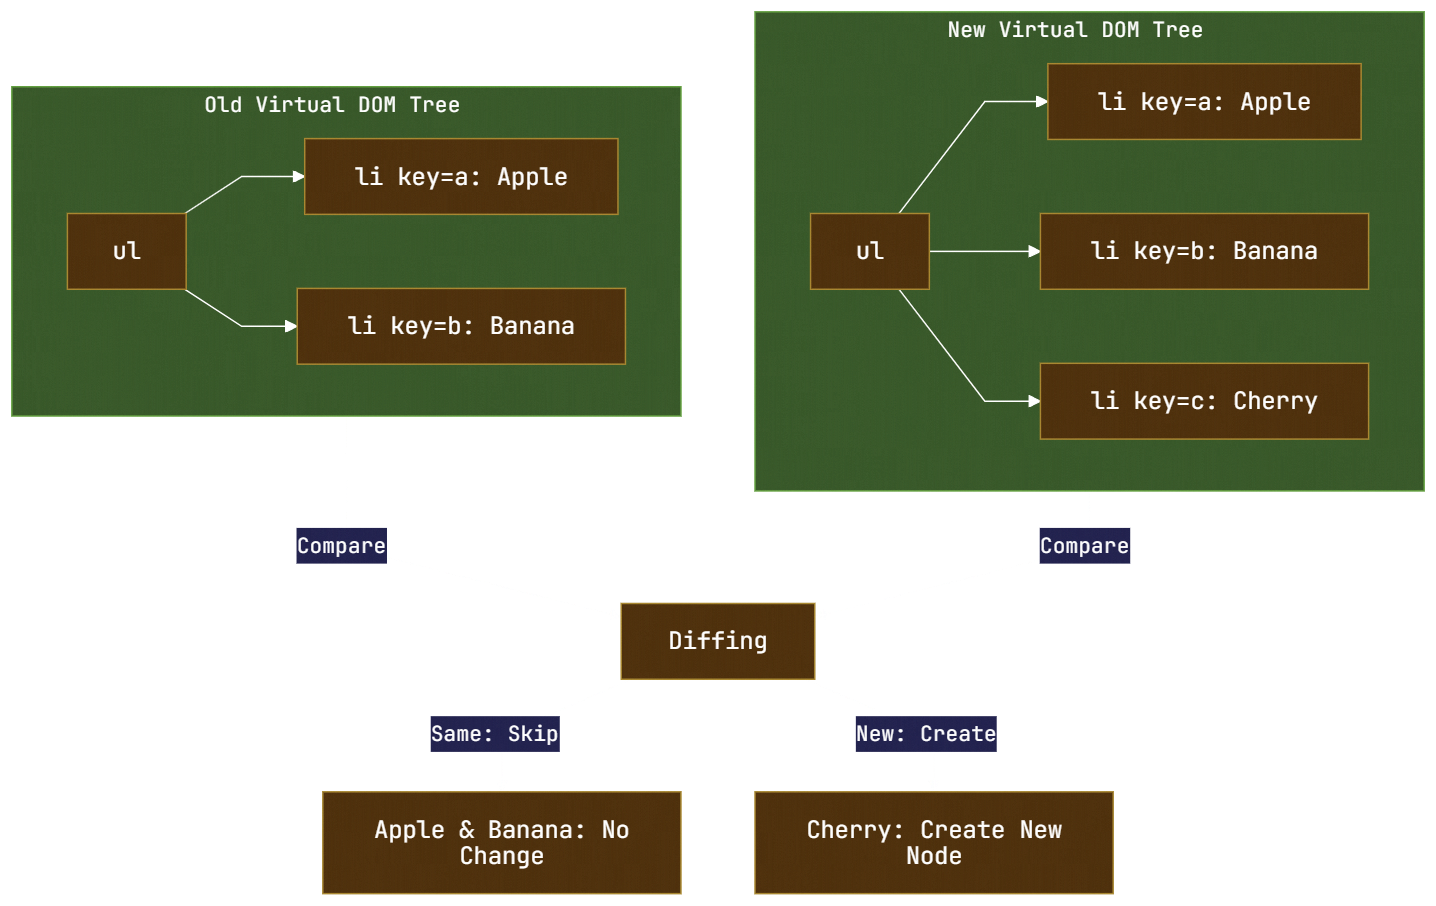
Here is a concrete example:
// Old render
<ul>
  <li key="a">Apple</li>
  <li key="b">Banana</li>
</ul>

// New render after state change
<ul>
  <li key="a">Apple</li>
  <li key="b">Banana</li>
  <li key="c">Cherry</li>
</ul>
React compares the two lists. It sees the first two items have the same keys and identical content, so it leaves them alone. It sees a new item with key c, so it creates one new Real DOM node and appends it. That is it. One insertion instead of rebuilding the entire list.
Phase 5: Minimal Updates Applied
After diffing, React has a list of specific operations needed. In our Counter example, the diffing result is:
The text node inside the
pchanged from"Count: 0"to"Count: 1"Everything else is identical
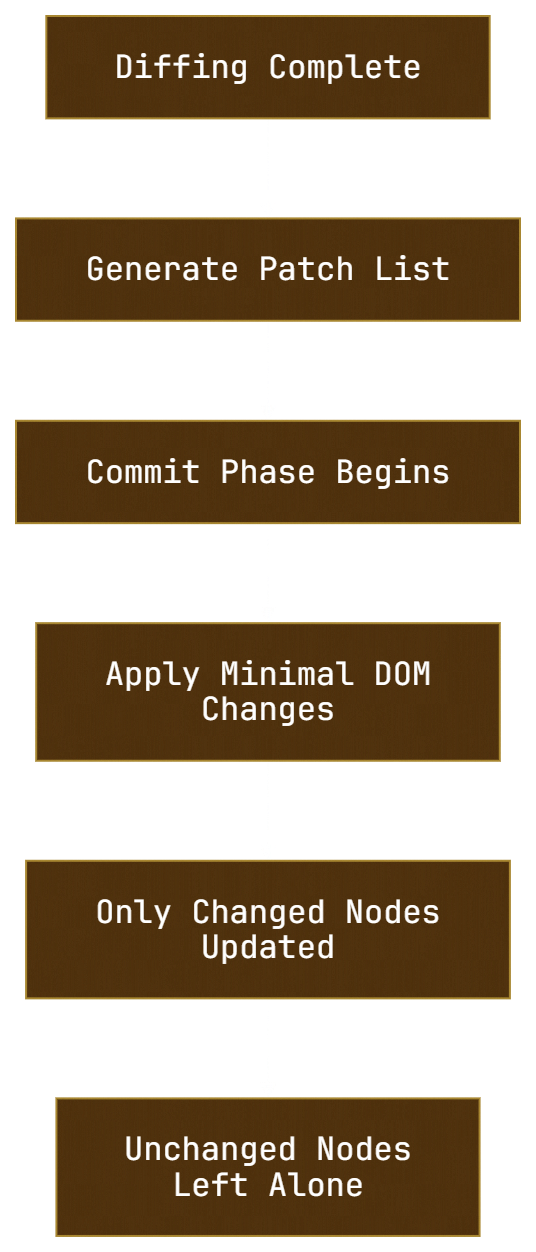
React packages these operations into a commit. During the commit phase, React applies these minimal changes to the Real DOM:
// What React actually does to the Real DOM
paragraphElement.textContent = 'Count: 1';
One text update. No layout thrashing. No unnecessary repaints.
Phase 6: The Real DOM Is Updated
The browser now sees a single DOM mutation. It runs its render pipeline for just that one text node, not the entire page. The update is fast, and the user sees the new count immediately.
Why This Approach Improves Performance
Direct DOM manipulation is slow because every write can force the browser to recalculate layout and repaint. If you update ten nodes in a loop, the browser might recalculate layout ten times.
React's approach batches and optimizes:
Batched updates: React can group multiple state changes into a single re-render cycle. If you update three pieces of state in one event handler, React does not render three times. It renders once with the final values.
Minimal Real DOM touches: By diffing first, React avoids touching nodes that have not changed. In a large table with 500 rows, if only one row's data changes, React updates one row, not 500.
Predictable performance: You do not have to manually optimize which nodes to update. React's diffing algorithm gives you near-optimal updates by default.
This does not mean React is always faster than hand-optimized vanilla JavaScript. If you have a simple static page with no updates, vanilla JS is fine. But for dynamic UIs with frequent state changes, React's automated optimization saves you from writing fragile, imperative update logic.
The Full Flow: Render, Diff, Commit
Here is the high-level lifecycle every React update follows:
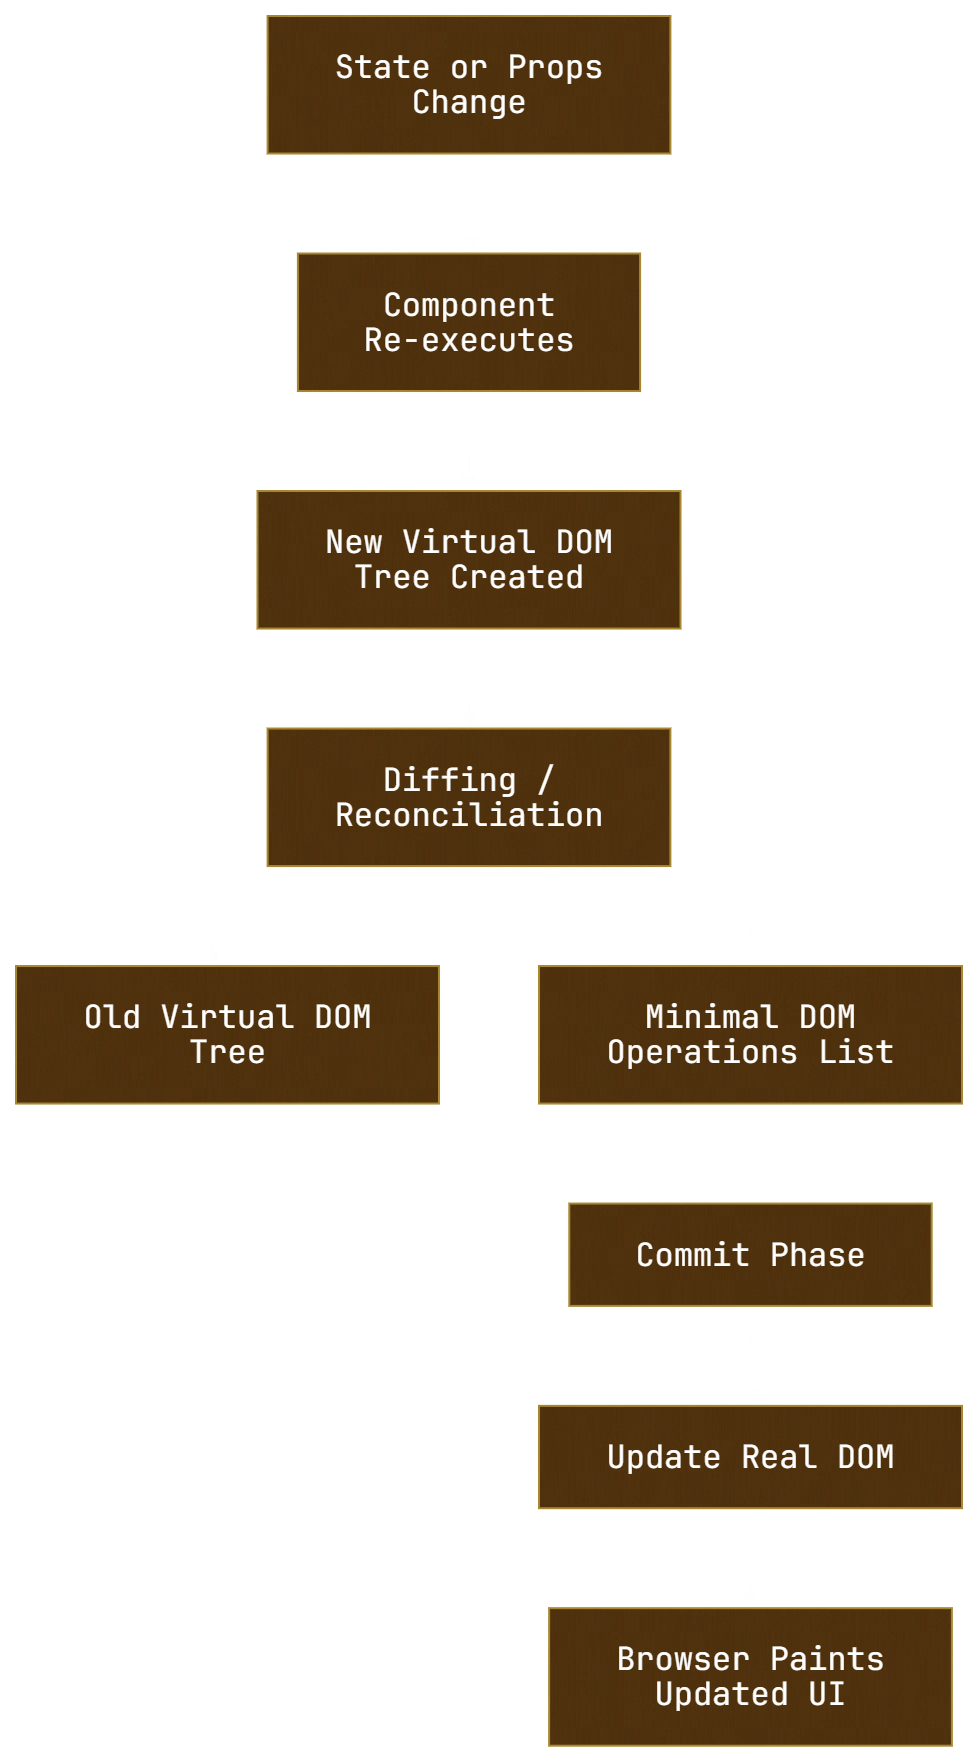
Render phase: Build the new Virtual DOM tree. Can be interrupted and restarted (React 18+ with concurrent features).
Diffing phase: Compare old and new trees. Figure out what changed.
Commit phase: Apply changes to the Real DOM. This is synchronous and cannot be interrupted, because the user should not see a half-updated UI.
Practical Tips Based on This Mental Model
Understanding this flow helps you write better React code:
1. Keys Matter for Lists
Without keys, React compares by index. If you prepend an item to a list, React thinks every item changed position. With keys, it knows exactly what moved.
// Good
{users.map(user => <UserCard key={user.id} user={user} />)}

// Bad - index as key causes issues with reordering
{users.map((user, index) => <UserCard key={index} user={user} />)}
2. State Updates Are Batched
React 18 automatically batches state updates, even in setTimeout or event handlers:
function handleClick() {
  setCount(c => c + 1);
  setName('Updated');
  // React renders once, not twice
}
3. Props Flow Down, State Stays Local
Remember: props come from the parent and cannot be changed by the child. State belongs to the component and can be changed by the component itself. If a child needs to change something that affects the parent, the parent passes a function as a prop.
function Parent() {
  const [count, setCount] = useState(0);

  return (
    <div>
      <p>Count from parent: {count}</p>
      {/* Pass state and setter as props */}
      <Child count={count} onIncrement={() => setCount(c => c + 1)} />
    </div>
  );
}

function Child({ count, onIncrement }) {
  // 'count' and 'onIncrement' are props
  // Child reads them but cannot modify count directly
  return (
    <button onClick={onIncrement}>
      Increment from child: {count}
    </button>
  );
}
4. The Virtual DOM Is Not Magic
It does not make React faster than every alternative. It makes React consistently fast without manual optimization. If you have a component that renders thousands of items and updates frequently, you might still need React.memo, useMemo, or virtualization. The Virtual DOM solves the general case. Edge cases still need attention.
Summary
The Virtual DOM exists because directly manipulating the browser's DOM is too slow for modern interactive applications. React's solution is elegant:
Keep a lightweight JavaScript representation of your UI
Rebuild it entirely on every update (cheap)
Compare the new version with the old version (diffing)
Apply only the minimal necessary changes to the Real DOM (expensive, but minimized)
This render-diff-commit flow is the core of how React works. You do not need to know the internal Fiber algorithm or the exact heuristics of the diffing process. What matters is the mental model: React builds a blueprint, compares it to the old blueprint, and updates the real building as little as possible.
Once you internalize that, debugging performance issues, understanding why keys matter, and reasoning about component updates all become much easier.